Search

thomas drake blog

Category

Uncategorized

Finalising Animation – Reflecting on Feedback

From our feedback, we knew what needed to be corrected within the animation and we knew how to go about enhancing various scenes within it also.  First of all, we were advised to consider an establishing shot to clarify in a more detailed way, where exactly this character is.  Second of all was to work on the lighting and try to stop the glare that we see in various sections of the room.  The third was to ensure that each scene led onto the following scene in a controlled and easy to follow kind of way.  In our previous animation, our monster was very uncoordinated and didn’t seem to run as smoothly as we would have liked.  The main thing that came out of feedback was our need to review our sounds an music and trying to get it right before animating again.

Conánn has been quoting himself a lot with this statement lately, ‘Animation is a radio play, and you add the pictures.’  It is proving to be very true in our case.  it is vitally important that we go back, review our sound and get it down to the level we feel it is 100% correct.  And once we reach that level, then animating our project becomes a little easier for us and becomes an easier process to carry out due to the ability to reference to the music and use it to assign appropriate key frames.  This will mean that each stage of the animation in accounted for in the music and with therefore run a lot smoothly and make for a more improved viewing for the audience.

We took this feedback on board and knuckled down to really try to improve the quality and appearance of our short film.  We met up quite quickly after feedback and discussed our music and sounds.  From this meeting we then allocated a day for us to sit down as a tea and get our music to the standard we each feel it should be at.  This also included recording new sounds for the monster and new high and low melodies in areas to height and intensify the emotions.

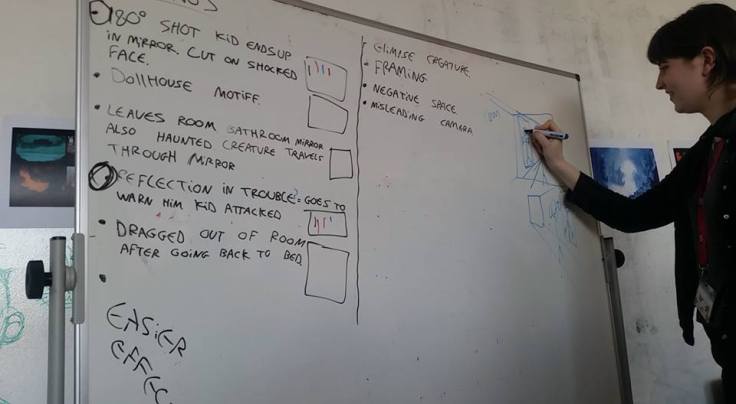
After we cleared sound off our list, we moved on to looking at an establishing shot.  I was assigned this role and started to research, develop and use tutorials to help me trial processes of animating cameras within Maya.  This process was an enjoyable one and it was a lot of creative freedom deciding where the camera would come from, where it would go and where it would finish.  After research and a few tests, I reviewed back with my team to show them what I was able to create.  They were happy with the establishing shot and this meant we could tick it off our feedback list and begin our next stage of improvements.

Phoebe looked at the lighting and various ways to tone in down in areas and attract to other areas to maintain that each component of the room was given its own appearance that really highlighted the work that went into it.  Lighting was difficult but through the help of our tutors, we managed to get it to a satisfactory level.  it was always going to be a tough thing to get spot on right but this is always something we can return to at another time to try and learn and develop.

Méabh started to redesign and remake emotions with the eyes using surface shaders.  The previous ones we used were a little too similar and so we wanted to try and design eyes that look alive and changed realistically with the situation our character found himself in.  Méabh did some great work with the help of Michelle from another team and through this we were able to achieve some great emotions and great variances of looks and attitudes.

Below is our original animation, followed by our now up to date animation, ‘Spooked’.


Overview and Feedback on Module

Imaging and Data Visualisation was many things.  A time of growth and maturity.  A challenging pair of assignments.  A great opportunity for development.  And a great chance to make mistakes but learn things along the way.

First of all, Floating City.  This assignment managed to push me way out of my comfort zone.  Having come from a 2D styled way of thinking, throwing myself into the creating of 3D pieces of work left me feeling a bit overwhelmed and a bit out of my depth.  I made some interesting models that didn’t really meet the solid standard for the project and I didn’t really know what tools did what as I blindly pushed my way through the project.  I was grateful to have such a strong team around me, made up of hard working individuals who were able to pick up and advise me in the areas I was struggling with.  Our team created some awesome pieces of work and I must say the whole process of floating city (although challenging) was a true learning curve and great creative project to complete.

The Head Model on the other hand left me with quite different initial feelings.  Having gone through floating city, I was now in a position where I knew what it was like to mess up and not know what I was doing, but now, now I was ready to get things right.  I was ready to stop taking my low levels of work as my standard.  I decided I was going to push myself and I was really excited to develop the head and see what I was really capable of.  Throughout the process, I had mixed feeling due to losing work and having meshes corrupt on me but even through all the stressful and annoying moments, I loved this project.  The growth and knowledge I managed to obtain and the tools and methods I managed to implement successfully really encouraged me and helped me reach a mind set that maybe this is something I can be capable of achieving.

Imaging and Data Visualisation gave me the opportunity to fail, mess up and embarrass myself.  And I wouldn’t have had it any other way.  Through my errors, trials and stresses, I came out stronger and more aware.  I came out more passionate about this medium.  And I came out of this module with a much clearer mind set, ready to take on whatever modelling/animation challenges that may come.  This module was a great encouragement and a great process by which I grew and became more aware of my abilities, whilst having a good bit of fun at the same time.  I mean, who doesn’t want to make a 3D bald version of themselves, right?!…No? Oh okay, well…it was still pretty cool.

This module has been approved.

Head Model Line Up

3D Head Modelling – Methods and Planning

General Note

  • When 3D modelling, always use reference images and research topology of similar objects.
  • Try to use side and front profile references for when modelling complex subjects.
  • Stay in normal mode (non-smooth preview) when modelling, but flick between non smooth and smooth preview regularly to check for mesh errors.

Reference and Inspiration Portfolios

  • As you research, keep a record of useful references and inspiration will grow, stay organised by creating folders based on themes, heads, props, 2D, 3D etc.
  • Consider using dropbox or google drive so you can access your collection n the go.
  • Always try to note down the artist name for reference images!
  • Line up reference photos/drawings.
  • Before bringing in a side and front photo into Maya, line up the images in Photoshop.
  • Consider adjusting the levels to improve the contrast and visibility of details.
  • Consider a three-quarter view photo as well.
  • It is a good idea to often switch between these different viewing modes (1,2,3 on keyboard). As smooth preview can often cause issues with mesh.

Patch Modelling (Building up a model in pieces – eyes, mouth, ears etc.

How to model an ear low poly to intermediate 3d modelling tutorial:-

Modelling a head with proper topology:-

Think – Plan – Produce

Understanding Pole Vectors and Pole Vector Constraints:-

Sometimes it is beneficial to trace over your model and re-do the typology.  There are various tools and methods to perform this.  In Maya this involves making the object ‘live’ and then using the quad draw tool under the modelling toolkit.

Re-Topology Info:-

Digital Sculpting

The modern workflow is to usually start an organic character by sculpting digitally in software such as zbrush & mudbox.  This allows the artist greater flexibility in design by moving the topology process after the 3D model is formed.

Below are 3D sculpt time lapses by artist Adam Fisher who specializes in 3D Character Modelling.

Mesh – Clean Up (Good for applying setting to ensure certain mesh properties don’t get messed up.

Mesh Tools – Sculpting Tools – Smooth

Hold Shift and ‘B’ to change size of brush.
Hold Shift and ‘M’ to change strength of brush

Normal Maps/Displacement Maps: – Info on Maps

Sphere with no triangles?

  1. Smooth a Cube using the mesh option then smooth it using ‘3’ on keyboard.  No triangles and good spherical shape.
  2. Sub Divide a sphere down to ‘8’

Sphere - No tris

and then delete upper cornered edges.

Sphere - No tris1

Pole – Vertices with more than four edges connected to it

(Conánn Suggestion) Thundercloud Studio Tutorial Modelling Guide: – Link

Tab – Left Click – Drags a face

Tab – Middle Click – Drags a row of faces

Animating a Camera Within Maya – Research

I have began to start looking at how to go about creating a motion camera within Maya.  This is essential for us as a team and for the establishing shot of our animated film.

Our opening scene will be a direct camera placed about our main character and our room.  Our hope with this is that we will be able to establish the environment our character is located in a more and clear way.  This establishing shot will allow the animation to begin in an effective way and set the scene for the rest of our project.

The opening camera shot will pan towards our character and will slowly edge to the right of the room.  The camera will then level with our character, directly beside where he is located.  This will give a more informative indication as to what our character is doing, and where.  From here, the camera will then pan to our original starting position.  This intro will hopefully cause a easily flowing and easier to follow viewing experience for the audience.

Below are the video tutorials I have used to gain knowledge of parenting, creating and animating cameras within Maya 2016.  I prefer the first recorded as it was clearly explained and was a good quality of video.

Below is a diagram I created of my rough plan for the motion of the camera within our opening scene.

Camera - Estbalishing Shot Diagram.png

Final Head Model Attempt

Well, after now 5 attempts at a head model, I have finally got a stage where I have managed to complete one. WITHOUT ERRORS OR PROBLEMS.

So, the whole process of coming through this patch of tough times, corrupted files and messed up meshes, I have came out the other side having learnt so much about this software.  I learnt how to use the modelling tool kit.  I learn quick hot keys to help make my Maya projects more effective and time friendly.  I also learnt how much resources and help I have within this course to encourage me and keep me pressing on, even when things do go extremely wrong.  The friends I have, tutors I have and support mechanisms in place within this course have all came through for me and helped me keeps things together when this assignment seemed to be going completely wrong.

The finished head model required me to save around 32 separate files, each demonstrating a new development and version of the head model as it progressed in its construction.  Below is an image of the head model as it stands completed.

31.png

I was very happy with it’s appearance and also my medium level of polys, which can be seen in the side view below of the poly count.

Final Head Model Mesh.png

A lot with this, I wanted to create an image that included my head form different angles so I duplicated the head three times and rotated each one to portray a different angle.  Below is the result of it.

Head Model Line Up.png

After researching how to make the head rotate on the spot, I created a playblast of my rotating head.  This is a good way to present the head in an interesting and informative way.

I also realised that due to saving over 30 versions of the head as it progressed, that I could create a video demonstrating in a rough way some the developments the head went through right up to it’s completion.  This didnt take very long and I also included audio over the top to add to the effect of the video.  It can be viewed below.

So we got there, and you can imagine the relief.  We made it! Didn’t we Davy?

Establishing Shot – Research

Following our feedback on our 3D Animation, we used the comments we received to start setting out an objective list on the improvements and items we needed to implement into our project to make it a further success.  Whilst the rest of the team were having a look at the music and matching it up to further refine it and make it more applicable to our film, I was doing research on the topic of establishing shots.

We were told that one of the major things missing from our project is an establishing shot that will suggest in more detail where our character is and give more light to the contents of the room.

An establishing shot is generally a wide shot to establish the location for a scene.  For example, it could be an exterior shot of an apartment building before we cut inside, or a hot of a city skyline before we go onto the streets or into a building.  Establishing shots should contain some information about the location and can be shot as plainly or stylistically as needed to help tell the story.  Often, director may transition from an establishing shot to the actors in one shot to help keep the passing and rhythm of the scene moving.

The establishing shot can be seen as an old style film making technique which sometimes cannot be avoided.  It is important to give the audience an idea as to where they are and where the characters are now.  If it can be done in an integrated establishing shot (e.g. character walks up to door of building or car pulls up outside location) then that is great, but that can’t always be done.

American film maker and director, Aaron Spelling, was very intent on using an establishing shot in his projects.  In his earlier work, Spelling was known to use an establishing shot in nearly every scene transition.  He felt it was extremely important for the audience to know they were in a certain place, a certain location.  Film making has gone very much away from this style of film which is a good thing, but we need to remember that every so often we need to stop and say, this is where we are, especially if it is to day to night transition then it becomes very helpful.

Aaron Spelling
American Filmmaker Aaron Spelling 1923-2006

Here is an example of an establishing shot used in ‘Charlies Angels’ directed by Aaron Spelling.:-

I found this video of very cinematic styled establishing shots.  These are very much large scale and so aren’t really going to be much help for us as a team, but they are pretty to look at.

I found an example of an establishing shot from the movie Spiderman which shows an initial outside pan of the building before we cut to inside the building and see Peter Parker enter the room.

Another establishing shot I found that I found interesting was the one used in the movie Shawshank Redemption which shows a prolonged pan over the entire Shawshank Prison before we find ourselves inside a prison bus with our main character.

Here is another used in Lord of the Rings to show the Shire of Middle Earth otherwise known as the area that the Hobbits live: –

When using Vimeo to look for establishing shots, it wasn’t extremely helpful but I did find a short animation that I enjoyed both the style and message  of.  It is called, ‘The Moment’ and was created by artist and animator Karis Oh.  It is based around a man who asks a woman to draw him.  When asked about what he does for a living he says that he listens, imagines and feels.  When she finishes drawing she passes the sketch to the man and he says, ‘It’s beautiful’ but he doesn’t look at the page.  When questioned about it by the woman as to whether he was going to looks t it or not he replied, ‘Thank you, but I’ve already seen enough.’ Whilst saying this he takes out his white cane and begins using is to lead his blind steps as he walks away.  I loved the message behind this short, the message of how we don’t need eyes to see the beauty in art or the beauty in people.  We learn the beauty of others with our ears and by experiencing the things that person does, say and reacts.  Below is the link to the short: –

After Vimeo didn’t deliver the research I was hoping for, I took to reading through some blogs and articles to see if I could obtain inspiration through them.  I found the blog below which talked through 3 secrets of obtaining an effective and compatible establishing shot for an project.  It covered establishing locations, establishing concepts and establishing viewpoints.

Blog on Establishing Shots

After reading this blog, I started to recognize the relationship between an establishing shot and an opening shot.  I watched this video on the importance of an opening shot and how it is a huge factor in the success and early capture of an audience’s attention.

Scary Movie starts with an opening scene showing the exterior of a mansion before we cut inside.  We need to as a team think of a way to pan within our room to introduce our room and our character.

The Cube (1997) uses an opening scene of a close up of the main character’s eye.  After this we see a full rotation and an almost full pan around the room the character is in to tell the audience more about the environment.  It maybe isn’t exactly what we are going to go for but it certainly has a creepy vibe and covers the interior of the room which are both characteristics we are aiming to achieve.

I feel like i have found an opening shot that I feel may work for us as a team.  it is within the following video and between 34 and 44 seconds into the video.  It shows a panning down into an octagonal room where we see people surrounding a man on a chair.  It is really ironic that our room is octagonal aswell!  If we had the camera pan down towards the top of our characters head then I feel this would be an effective way to introduce an establishing shot into our 3D Animation.

After further research I found out that this opening scene is from the 1987 film ‘The Untouchables’.  It is also very ironic that the guy in the image is being pampered and having beauty therapy and our character within our animation is rubbing his face, polishing it is some form of beauty regime.

I will regroup with my team and talk this over with them as a potential route for us to take in regards to an establishing shot.

Head Model Attempt 5

So, having started to recover after losing my last (almost finished!) head model, I began my 5th attempt of a head model and wasted no time after losing the previous one.  I started Attempt 5 yesterday and worked right through over the weekend to try and get it back up to date.  And tonight I had gotten back to the same stage I was at on Friday evening.

I was using another new tutorial that my friend Robert recommended to me and it has been a huge benefit to me this time around.

Now let me ask a question.

Anybody here consider themselves to be a foolish student who should have learnt from their mistakes?


I forgot to start saving versions as I went along and Maya wasn’t through teaching me a lesson.  So, here we go again. What went wrong this time? My mesh decided it didn’t like looking like me, instead, it wanted to take on the form of Davy Jones from The Pirates of the Caribbean movies, as you can see from the images below.

Head Model Attempt 5 (a)Head Model Attempt 5 (b)Head Model Attempt 5 (c)

So yea, back to the drawing board.  This time, I think I have learnt from my mistakes and am prepared for any outcomes as I will be saving like crazy this time and will be updating all my Autodesk software so I hopefully won’t be open to any more attacks on my work or any more mess ups on my part.  The levels of both stress and personal annoyance is high but this time, is for real.  The battle, begins.  Isn’t that right Davy?

davy_jones_zbrush-central80000002
Davy Jones a.k.a My Current Head Model

Animatics

We had a great time with creating anamatics….all 4 of them….honest….we did.

Our story started very broad and very complicated as you can see from our first animatic below.  The story wasn’t very clear and the meaning behind the short film really wasn’t adding up.  Talking to Michael and Yuan helped us as they gave us advice on where to start the animation and how to simplify the story a bit to try and allow it to tell a clear and simple but effective story.

After this animatic proved to be too difficult to follow, I took on the task of creating our next animatic within MS Paint.  We still hadn’t gotten our character designs nailed down so we went with a ‘Blu from Foster’s Home for Imaginary `Friends’ styled character.  This story was slightly clearer but the camera angles were off and the overall fate of the reflection and our character are very unclear.  We also see a bit too much of our monsters and this is something we really needed to consider as we developed our stories.

Having found more flaws in that animatic, we moved onto another drawn animatic with a few more interesting camera angles and an attempt of a clearer outcome for our character.  The fate of the reflection is still a bit unclear and the monster also seems very unrealistic.  We planned with Mike on how we could go about simplifying this further and about which camera angles would compliment our project best.

After more distraught feedback on the improvements needed to our story, I began another MS Paint created animatic but only got to the first several frames as we as a team cam dup with a rough plan and idea for the animatic.

This slideshow requires JavaScript.

As time was pressing on, we decided we would create a 3D animatic within Maya and set out the key poses and key frames of our character and monster.  This gave us a nice representation of our story, but in a 3D space.  Thanks to Conánn of his advice on simplifying our story, we were able to create the animatic and produce and easy to follow storyline and an interesting variation of camera angles to help progress our short movie as well as add to its overall watch appeal and quality of work.  We were happy with this rough animatic layout and began to animate, using it as our constant reference.

Storyboard Developments

We began our storyboards by considering the various genres, styles, themes and meanings we could potentially pursue.  We had a few ideas that we thought would be interesting but they soon proved to either be too common or too complicated.  We began thinking deeper into our story and narrowing down each of our ideas to come to a united decision on narrative.  Below is an image of our planning stages for our new narrative.

6

Having researched, shared ideas and made decisions on our project, we created our first storyboard layout.  We talked about using techniques such as a dolly zoom, framing, negative space, misleading cameras, an unseen creature, parallel shots, crooked angles and motifs within this story.  We drew out our thumbnails and began to use it to create character designs and an animatic for a rough draft as tot the direction we were planning to go.

5

After receiving feedback on our storyboard, we understood the issues and problems that could come up for us and the difficulties we could experience if we were to try and execute it together.  After taking feedback from our tutors we were able to meet as a team and discuss how we wanted to progress.  We looked at our feedback and the suggestions from our tutors and began to write out a new storyboard.  One that would hopefully demonstrate a clear narrative and a clear meaning.  Camera angles are becoming an interesting issue for us at this stage and we will need to research further into them and get advice from our tutors on the best approach for us to take in regards to them.

4

We created yet another storyboard but again this one had unexplainable endings and camera angles that just weren’t reading well.  The presence of our monster is causing some confusion and we as a team will really need to talk about the future or appearance of the monster.  Our character design is coming on and from this storyboard we were able to start creating concepts for our main character

2


1

I was very confused when going over the falling scene within our short film.  I wasn’t sure as to how the character would fall, what he would fall on, where he would land or whether he would even fall at all.  I began drawing out the rough drafts below which symbolise my thought processes as I tried to make sense of this scene within our animation

9
This first scene show the mirror and our character within the mirror looking confused and jumbled and to what exactly is going on.
12
We see our characters reflection appears in the mirror suddenly and he knocks it
13
This frightens our character and he stumbles back from the mirror
11
Our character falls on a can or another item that is placed irresponsibly on the floor
10
Character lands either in open space, or against the side of his bed.

I talked this over with my team as they were under the understanding that our character doesn’t fall at all, he would jus stagger back.  Having thought it through it my head, if this is the story we are going to pursue, it makes much clearer story telling if our character falls.  It shows his weakness, his fear, his venerability.  I though, ‘If I was looking in a mirror and my reflection banged the thing, I’d be on my backside pretty fast.’  The fall is still under the development stage and we can make much more definite decisions over the next week or so as to whether or not we want to pursue the fall any further or whether we need to adapt our story so a fall isn’t necessary.

Create a free website or blog at WordPress.com.

Up ↑